Yarn: wool (white) Novita -70g (in 100g / 270m), acrylic (brown) Adelia "Ivia" - 70g (in 100g / 200m)
Yarn consumption: 140 g.
Needles: circular No. 4.5 and No. 2.5 (2 pcs.)
Needle sewing with a large eyelet
Scissors
Ruler
The size of this scarf: 10,5x90cm.
The density of knitting: 1cm = 2.5 p. Horizontally
How to tie an original scarf for a child - step by step instruction
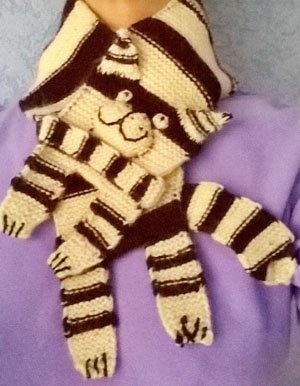
This children's scarf consists of 6 parts: a cat's body with paws, a collar-loop, a tail, a muzzle, two ears.
Begin to knit from the paws:
- On circular knitting needles No. 4,5, we collect 5 loops and knit 4 rows with face loops. We also sew the original rows, also, with facial ones. In each new row we remove the first loop, the latter we make the purl.
- In the 4th row add 2 loops and knit another 4 rows. We increase the row to 9 loops, we sew 5 rows and enter the brown thread. We knit 3 rows of facial, 4 rows - purl. So, we knit up to 28 rows, alternating colors.
- We collect 8 additional loops - this will be the seal's breast, we cut the threads, we advance this part (the paw and 8 loops) on the line and on the same spokes along the same principle as the first, we knit the second foot.
- We reach the 16th row and knit.
Now we knit the base of the scarf - repeat the main drawing four times. (See diagram)
Tip: make sure that when changing the color strips, the contrasting threads are woven into the base fabric, otherwise they will slop around the edges in the finished product.
Hind legs:
- We send 9n., Close Sn, - central, we knit the following 9n.
- Then the order of work is the same as with the front paws, only in the mirror image: we do not add, but decrease - 9n., 7n., 5n - close the row.
- We return to the second leg - and also we untie it.
Collar-Loop:
At a distance of 12 cm from the base of the scarf (not the tips of the feet!), From the side, on the spokes number 2, 5, we lift 6 loops and knit a strip of 28 cm in length, alternating the pattern every 4 rows. Then sew the ready-made collar-loop in two places - from the back of the diagonally to the base of the paws, from the front - horizontally across the width of the scarf. Look at the photo.
Tail:
- On the opposite side of the scarf, from the back part, at a distance of 6 cm from the base, raise 7 loops on spokes number 2.5 and knit, alternating the pattern to 20 rows, then add 2 loops.
- In the 26 row - we increase by 2 more loops. We knit until the total length of the tail is 14 cm.
- We close the hinges in three steps.
Muzzle:
- We collect 12 yarns of white yarn.
- From the 4 rows we add in each even row 1 loop to 18p., We bind 4disks and begin to decrease: also in each even row one loop up to 12p.
- Then close the hinges in three steps. The muzzle should be slightly convex. Immediately embroider on it a spout, mouth and sew on the collar.
Tip: it is better to sew a white muzzle with brown threads - this will add a special originality to the image of the cat.
Ears:
- We collect 9 items of white yarn, we knit 4 rows, change to brown and reduce 2 loops.
- Next, in the 10th row, we cut 2 more loops, in the 12th row - 2pets and close the row.
- Sew our ears over the muzzle.
Assembling the product
- We embroider the eyes of the cat and the "claws" on the legs.
- You can add a bow to the collar or embroider the child's name.
And now, our scarf is ready!
This knitted knitted scarf can be worn in several versions: tie in a classic way, tuck on top of a collar or thanks to a special collar-collar, wear on the principle of a tie. In this case, the position of "cat" will always be different. Show imagination and please your children with unusual, original things connected with their own hands.