Applique from cotton wool: winter picture, master class Photo
This application combines the simplicity of performance, the availability of materials and the beauty of the composition, so it's just perfect for children's crafts.
Necessary materials:
- cotton wheels;
- cardboard blue or blue (ideally - holographic);
- cotton wool;
- cotton buds;
- scissors;
- PVA glue.
Step-by-step instruction for creating a winter image from cosmetic disks:
- We begin to make a winter picture of appliqués made of cotton wool from a fairy white tree. We will place it on a cardboard basis closer to the left edge. As a barrel for him, we choose one cotton wand, and the snowy crown will serve as a cotton wool disc. "Plant" our sapling on cardboard with glue.
- We cut several disks in half and make drifts from these halves, gluing them along the bottom edge of the cardboard base.
- It is difficult to imagine a winter picture without a Christmas tree. Therefore, this forest visitor will also be on our application. To make it, bend one cotton wool in half, draw a silhouette of the Christmas tree on it and cut it out. We unfold the workpiece and glue it between the snowdrifts next to the snowy tree.
- Now, from the edge of the wadded disk, we cut out a thin month with scissors, and from the tiny pieces of cotton wool we form snowflakes (or stars - to whom we like the most). We attach these parts of the picture to the cardboard with glue - and the winter landscape is ready!
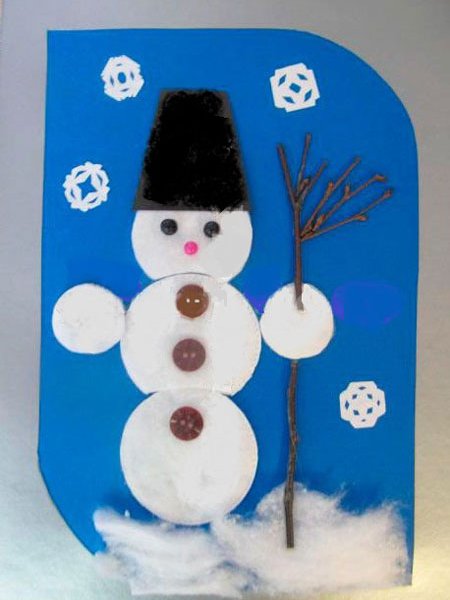
Snowman made of cotton wool, master class with photo
The winter theme can not do without a snowman - a constant hero of New Year stories and a resident of snow-covered yards.
Necessary materials:
- cotton wheels;
- PVA glue;
- colored cardboard (blue, silver and black);
- scissors;
- glue "Moment";
- Ruler and pencil;
- cotton wool;
- beads (a pair of black and one red);
- small buttons (three);
- branch of a tree (thin).
Step-by-step instruction for making a snowman
- Prepare a frame for our picture of silver (gray) cardboard. To do this, turn the sheet of cardboard and draw a rectangle on it, retreating 2 cm from each edge. Two corners on this rectangle are rounded - right upper and lower left. We cut out the middle of the cardboard sheet. The resulting frame is pasted onto a sheet of blue cardboard, which will be the basis for the application.
- Let's move on to the hero of the application - our snowman made of cotton wool will consist of five parts: a head, two hands, a trunk and a lower part. The disk that will be used as a head, make a little less in diameter and cut off one edge along the arc slightly in order to avoid a lap with the trunk. Also, do with the trunk, cutting off the edge so that it does not overlap the lower part. Disks, of which we will make the hands of a snowman, cut no more than 3 cm in diameter.
- Using glue, glue all the blanks of the snowman to the cardboard and make him a bucket-bucket of black cardboard. To do this, cut out the trapezium from the cardboard with a base length of 5 cm and a vertex of 3 cm and glue it to the head of the snowman with PVA glue.
- With the glue "Moment" we attach black beads in the form of eyes to the head of a snowman, a red bead - in the form of a nose and a button on the trunk.
- "We put" a snowman from cotton cosmetic discs on the snow, made of pieces of cotton wool, into one of the hands "insert" a broom from a twig.
If desired, you can give this winter hand-made artwork a status of the picture, making on the reverse side two paper loops and stretching in them thread for knitting.