Actually, for this you do not need anything special:
- rags or paper napkins;
- alcohol cleaner or conventional wiper;
- often use vinegar or special means for cleaning dishes and dishes;
- a set of brushes, sponges, metal brushes, etc .;
- lemon juice or essence;
- dishwashing detergent or usual liquid soap.
Having prepared all this, you can start cleaning, and below is a step-by-step instruction.
The first step is cleaning the microwave tray
Even in very old microwave ovens there are rotating removable plates (trays), they are made of special heat-resistant glass or plastic. Remove it and place it in the water with a cleaning agent, if it is even very dirty, then the product will soak all the accumulation of food. For cleaning especially dirty pockets, you can use cleaning sponges, metal brushes, depending on what the tray is made of. As a rule, it is enough to immerse it in a warmer with a cleaning agent and all the dirt is washed off. Be sure to rinse the tray after washing.
The second step is cleaning the crumbs from the microwave
Food crumbs, this is a special dirt, for a long time in the micro wave, from the temperature they make a particularly unpleasant smell, except, during cleaning they interfere, so immediately clean them of the oven. It's easy to do with any wet paper napkin, sponge or a rag. You can turn the microwave completely down and shake it all in a bucket.
The third step is the cleaning of food debris
The food left after harvesting the crumbs with a wet towel is the main problem and the object of harvesting. For cleaning you will need harvested cleaners, as well as a little time, patience and effort. It is important not to overdo and damage the surface of the microwave oven, deep scratches inside are not permissible. Therefore, do not use metal sponges, nails, knives and other sharp objects for cleaning. The modern market of cleaning agents is abundantly represented by similar substances, after application of which any sugared food departs from the surface. In addition, they are harmless, and the rest of the sodden food is easily washed with a towel or napkin.
The fourth step - cleaning from fat and drops
If you take a close look at the microwave after all the procedures that have been performed, then you will be surprised to notice that the stains on the walls are still stained with fat and liquid food. The fact is that fat very strongly adheres to the walls of any surface, and with constant exposure, the temperature hardens. Remove such stains can be with vinegar or essence diluted with water, this solution corrodes fat, and it is easily washed off with a regular sponge or a scoop. If vinegar does not help, then there are special washing aids that corrode any greasy stains. Vinegar plays and another important role, it completely removes any smell.
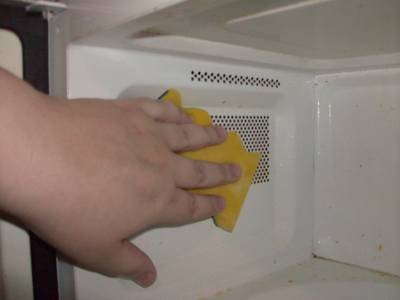
Cleaning of ventilation of appliances in microwave ovens
The problem of cleaning such mechanisms and ventilation is that they are either inaccessible or difficult to access. There are furnaces that can easily remove the lid and do not disassemble, clean the engine and ventilation with the WD40 dispenser. But if there is no such possibility, then it is better not to engage in the independent analysis of the microwave oven, but to give it to the master.
The fifth step - wiping and drying oven
This is no less important step, the microwave should be perfectly wiped and dried from moisture and chemical detergents. If this is not done, then by tomorrow you will notice that instead of the old unpleasant smell, there will be a new no less unpleasant. Wipe clean with dry paper labels, which absorb moisture perfectly.
The sixth step is washingtons
The door to the microwave is no less dirty than the inner surface. For cleaning, use the same tools and tactics as for the walls, and to ideally wash the glass and leave no greasy stains or stains, use vinegar or a special aerosol-wiper. Advantage of the acetic solution in its complete safety and naturalness, well, after the glass, it is necessary to wash the glass well with water and dry it.
The seventh step is an external cleaning of the microwave oven
You can carry out external cleaning as you like, use any means, just avoid those that will damage the surface. The ideal option is vinegar with water or cleaning products, sponges, brushes and napkins. You should pay attention to the fact that the funds do not fall into the ventilation, through the holes in the bottom or the back wall. Then dry the surface, all the protrusions and hollows.
Eighth step-removing odors in the microwave
As a rule, the smell after such cleansing, especially with the use of vinegar should disappear itself. However, there are cases when the microwave is not used for a long time and the smell stagnated, as a result, most likely he remained in the ventilation. Get rid of it can be an old home method - in a cup of water, add a couple of spoons of vinegar and a couple of spoons of lemon juice. Now put this hot mixture in the microwave for 5-7 minutes and turn on a sufficiently high temperature, it will boil and emit vapors and citric acid. Suchapar penetrates into every slit, including in ventilation and eliminates odor. Sometimes you can use a solution of soda and water, but this is in extremely extreme cases, because soda can not very well act on the surface of the microwave.