No matter how the fashion changes to hairstyles, playful, cute curls and luxurious elegant curls always remain at the peak of popularity. Papillots, taking their history from the time of our great-grandmothers, have long been used in the hairdresser's art and are relevant to this day. Well, if you are not at all familiar with this type of hair curlers, you do not have time to visit the hairdresser and you do not know how to make your own papyolki, be sure to listen to our advice that will help you at home to find the desired curls.
Папильотки is a version of hair curlers reminding bows, intended for a wave of hair. Previously, they were made of paper. The popularity of Papillococcus is related to the fact that they are considered to be one of the simplest, easy and accessible ways of creating natural curls. By the way, making a hair clip is completely safe for the hair. Also because of water resistance and resistance to chemical components, they make clear and expressive curls. Plus, thanks to the lack of a fixed shape and softness, they are comfortable when used during sleep. Therefore, they can be safely done before going to bed. And last, the hairpins - this is from all existing one of the most affordable and inexpensive ways of waving the hair. Doing it yourself is easy, the main thing is to follow simple instructions and you will certainly get it.
How to make a hair clip
If you need to quickly wind hair, making your hair on your own is very simple. Cut the newspaper into A4 sheets (or take any other thin paper). Fold them several times along the long side so that the tubes will turn out, bend them in half or pass through homemade papillot's a string or a thin strip of fabric (then a sheet of paper should be of the format necessary for the size of the future ringlets).
Grab the hairy tip of the strand and wind the hair to the roots, trying to hold them in the middle. After fix it with a rope or tie the ends of a paper tube with each other, a little before they are wetted.
How to make yourself curls with the help of a hair saver
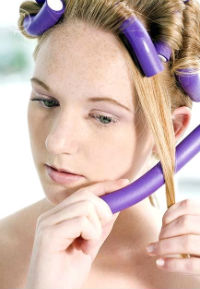
- Get some wigs. To date, they are mainly made of elastic or rubberized foam rubber with a wire inside. They can have a length of 20 to 25 centimeters, and a diameter of 8 to 10 millimeters. The result of curls depends on their size.
- Before you make a hair clip, wash your hair well and dry it thoroughly before using it. After that, the head was first divided into squares of 2 × 2 cm or 3 × 3 cm each. Arrange all the strands in the direction of the hair. Each strand with a means for fixing the laying should be well moistened so that the entire strand is impregnated. Beginning at the end, try to wind the strand yourself with a haircloth. Remember that it is necessary to twist perpendicularly stranded strand.
- Using a special plastic clip, fix the hairpin. Then moving gradually from strand to strand, curl all the curls. You want to alternate the direction of the curl in each row, bravely do it. In order to protect future curls from deformation while drying with a hair dryer, cover the hair with a hairdryer. Using a hair dryer, choose a weak or medium mode, which will not break curls.
- After drying, gently remove the papillot, initially removing the clamp, and then carefully releasing the hair. It seemed to you that the hair turned out to be very curly - cut the curls and comb them, modeling the hairstyle the way you want. By the way, the very thickness and intensity of the curls you can independently vary in the process of the most curled, winding large strands or smaller. Do not want to be very curly, use 10-12 papillotok and no more.