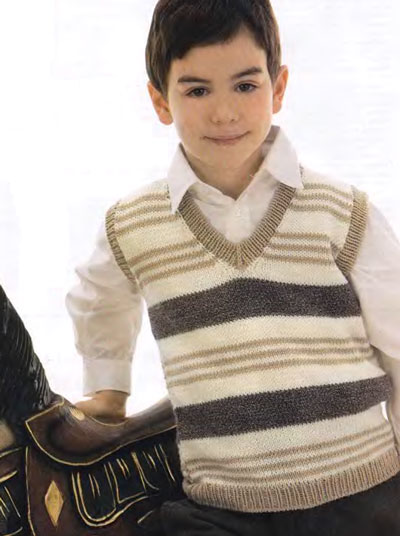
One of the important issues for young mothers is how to dress a child, so that he does not feel hot and at the same time that he does not freeze. Solve this issue can be if you put on a child's knitted shirt. It allows the child to move freely, does not restrain movements, protects the child's back and chest from coolness and wind. Knitted sleeveless jackets are very comfortable clothes. They are knitted and crocheted. Your child will like a comfortable, elastic, warm sleeveless tie, knitted. The children are very mobile, and the sleeveless shirt does not restrain the movements and this will really please the baby.
Children's T-Shirt
To knit sleeveless, you will need:
- 150 grams of woolen thread, for a baby 5 or 6 years old
- Circular knitting needles number 3,5
- Stocking knitting needles number 3,5
It is important to determine the design of the future children's vest. If the work is done for the first time, the best drawing will be strips, they will be different and very beautiful. You can use the finished pattern, and if the dimensions do not fit, they can be changed by their standards.
Description of work
Back
We will pick up 86 loops, we will fasten 2 sm a elastic band (1 item obverse, 1 item purl) and we will continue to knit a facial smoothness. From the beginning of knitting by facial smoothness after 42 rows, at a height of 16 cm, we will close the loops to form the armhole. Once we close 4 loops and close two times on two sides, in each 2-nd row, all we need to close 64 loops.
After we have fastened the 84 loops with the front surface, from the beginning of the work, at the height of 30 cm, we will close the 20 middle loops for the neck and on both sides we will close the three loops once and once again close two loops in each second row.
Having drilled 84 rows of facial smoothness, from the beginning of the work at an altitude of 32 cm, we close the loop for the cutout of the throat of 20 loops and then on both sides we close once the three loops 1 time in each 2nd row we close 2 loops. After engaging the front face from the beginning of the work, at a height of 35 cm, we close the remaining 17 loops in each shoulder brace.
Before
We knit, as a back. From the beginning of work after 48 rows of facial smoothness (at a height of 18 cm), leave the middle loops unclosed and begin to form a V-shaped cut, then both parts are knitted separately. At the edge of the neck, we will again type in the first row one edge loop from both sides. In order to form the bevel, we subtract in each second row 11 times 1 loop and 4 times less in each first row. To do this, we'll fasten the right part to four loops from the end of the row, then we'll fasten the two face loops together. On the left side we knit the edge loops, we remove one loop, we will fasten the 1-st line and extend the loop through it. From the beginning of work at an altitude of 32 cm, we will close the remaining 17 loops on each shoulder bevel.
Assembly
We will perform shoulder seams. From the edge of each armhole, we will type 82 loops, we will fasten with a rubber band 2x2 2.5 centimeters. Carry out side seams. We select on the edge of the cutout of the neck on the circular spokes 94 of the hinge, we will put into operation 2 hinges left unclosed. And at the same time we will fasten two loops in the middle of knitting, and in each 2nd circular row we will fasten the 1st loop together with the previous person. loop and draw a loop through it. At a height of 2.5 cm, close all the loops according to the figure.
If the waistcoat is striped, then in knitting as you invented the pattern, the thread colors change.
The finished product should be moistened and allowed to dry.