Snowflake from polymer clay, master class with photo
We are tuned to a festive mood, we include New Year's songs, make fragrant tea and start to work. To do this you will need:
- A piece of white polymer clay
- The form for a cookie in the form of a snowflake (do not use it afterwards for cooking)
- Skalka
- White sequins
- Toothpick
- Baking paper
- Oven
- Brush
- Piece of ribbon or cord
Manufacture:
-
Soften the material and place it between two pieces of parchment. Roll out the rolling pin into a thin layer. The size should be such that the whole mold is placed. - Put the mold on the bed and press. Separate excess pieces and free the form. Do the same for a few more snowflakes.
- Take a toothpick and make a hole in each snowflake. Through it we will thread.
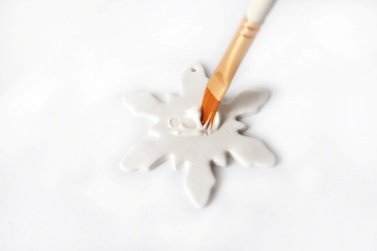
- Lay out the products on a baking sheet, pre-cover it with parchment. Bake the clay according to the instructions on the package. Let it cool down, and then apply a thin layer of white glue. Sprinkle it with a layer of balsam and lightly press it down. Leave to dry.
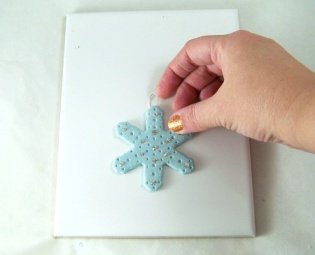
- At the end we thread through the hole and hang snowflakes on the tree or decorate them with gift wrapping.
The next snowflake will be done according to the same principle, only the decor will be made slightly different.
- Polymer clay of blue color
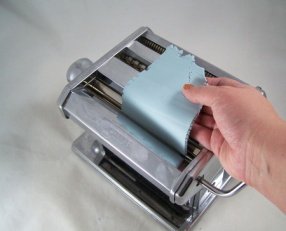
- The machine for pasta
- Shape as a snowflake
- Needle for holes
- Hook
- Transparent beads
Manufacture:
- We soften the clay and let it pass through the pasta machine. If you do not have one, do not be discouraged. A regular rolling pin or a glass bottle will come off.
- Put the resulting layer on the work surface and gently press it with a mold. From above the clay can be covered with cellophane and already through it you can cut out a snowflake. So the edges of the product will be more smooth, not so sharp.
- Carefully remove excess pieces and use a special needle to make a pattern on your polymer snowflake. Decorate it with beads and bake in the oven. After all this, let it cool down, and then insert a special iron hook.