"Valenki and boots, not filed, old ...". Valenki is a traditional Russian footwear, which warms even in severe frosts. True, they produce mostly the same colors: gray, black or white. You can decorate felt boots yourself, to look fashionable and stylish. How to do it, we will tell in our article.
How to decorate felt boots with your own hands
If you do not doubt your talents as an artist, then use acrylic paint for decoration. Apply glue PVA to the place you want to paint over. After it dries, take a soap or a white chalk and draw a picture. Draw a circle around the outline with a black paint. Use a thin brush. And now it remains to paint the image. The drawing will last for about eight hours. After ironing boots, covering them with a cloth.
If you want to look fashionable, decorate the felt boots with fur. In the coming season, designers use fur trim in their new collections, creating an image of fairy-tale characters. Choose the fur that you want to decorate the boots. Scissors cut it to the desired size. Sew it to the felt boot from the inside. Fold it to the outside and glue it. Excellent will look like boots with a knitted hat and a fur coat.
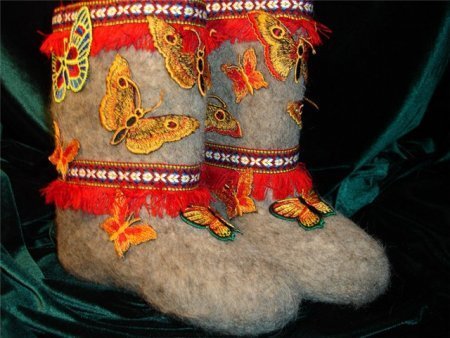
Funny and bright appliqués are suitable for decorating children's shoes. You can create funny animals, cartoon characters, cars and snowflakes, in general, anything your heart desires. You can buy ready-made patches or create an application yourself. Suitable for this are different pieces of fabric, beads, buttons and ribbons. Create an application. Sew it or just glue it to the shoes. You can also sew shoes with a beautiful cloth.
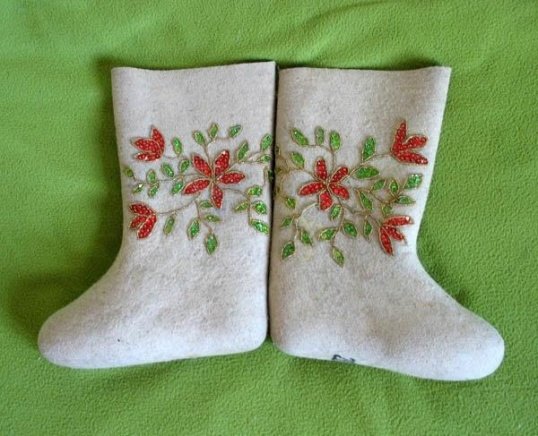
How to decorate felt boots with beads
For work you will need:
- multi-colored beads
- thread
- needle with a thin eye
- marker
- First you need to come up with a beautiful pattern. Rummage on the Internet and see examples of pictures. Choose round beads for work.
- Now draw a contour drawing with a marker. Mark the lines on the bootleg.
- Take thick threads and begin to embroider. Thread the thread in the needle, string the beads and fasten them to the felt. Beads should be placed tightly.
- After you create a picture of the beads, fix the thread from the inside.