To distinguish himself from all originality and originality, expressing all his creativity in the gift, and unlike others, investing there love and diligence even in the manufacture, and not buying the finished products in the store. We will tell you how to make your own a corrugated paper 👨👩👧 tree. Relatives and relatives will be delighted, because it is so unusual, and the handicraft is the main symbol of the upcoming holiday - the New Year. It can decorate your interior or to whom you are going to present this work of art. Moreover, our procurement will look harmoniously on the festive table, the real Christmas tree. The volume, colorfulness and effect of this magnificent fur-tree will be in our craft, as our miracle will be made of corrugated paper, which we will loose. Follow the instructions with the photo below. Everything is simple, make and please yourself and your loved ones.
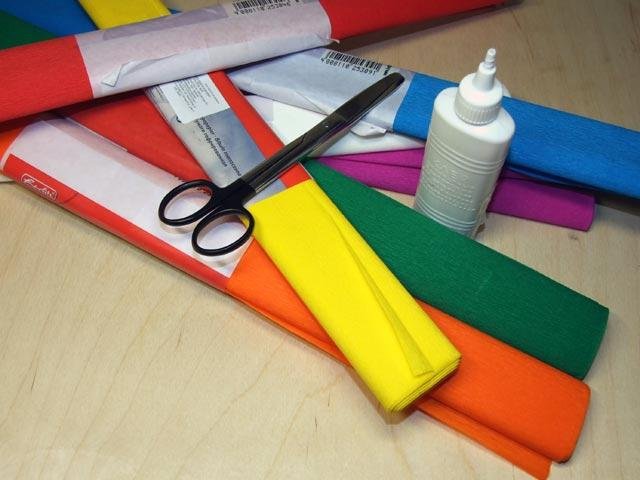
For work you need:
To make a tree, you will need:
- Cardboard
- Green and red corrugated paper
- Scissors
- Toothpicks
- Glue
- Vata
- Sequins
- Bow or ribbon
- Pencil
- Ruler
- Compass
- Beads
- thread
Step-by-step instruction:
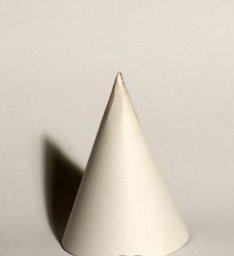
- Let's start with the basis for our beautiful Christmas tree. Take the cardboard, draw a strip 30 cm long, divide it in half and mark 15 cm with a circular draw a semicircle with a diameter of 15 cm (from the strip to the strip). Cut out the resulting workpiece and add it so that the fold is again on the same middle. Our 15 cm cone is ready.
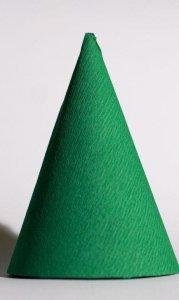
- We take corrugated paper of green color and cover the cone along the entire perimeter. The edges are glued together with glue Moment (or PVA). Now our foundation for the future craft is completely ready (our stem).
- We pass to our needles and give the volume to the figure. Cut from the corrugated paper strip length of 15 cm, 1 cm wide. For a stem of 15 cm in height, we need about 110-130 of these strips. You can use different shades of green or one - it depends on your desire, patience and imagination.
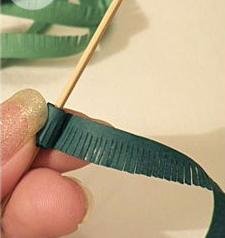
- We continue to make pine needles. To speed up the next action, you can take several strips at once, fold them into one and gradually make incisions with scissors on them (as in the picture below), the notches will be slightly more than half the strip.
- When we cut out all the strips, we go to the most important stage in the production of needles. We take one strip and wind each one on a toothpick, tightly pressing. The ends of the strip are glued so that it does not turn around, let's wait until the glue grabs and dries. After complete drying, remove the workpiece from the toothpick.
- We do the last stage with all the stripes. Procurement is obtained, as in the photo below.
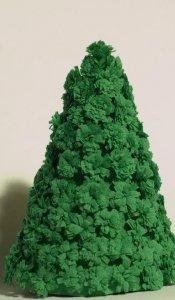
- When all the strips are ready and dried after the treatment with glue, we move on to making the volume. Take each roll and raspushaem it (that's why we did notches on each strip). It turns out three-dimensional figures, similar to pompoms.
- We return to our cone. We glue our pom-poms (pine needles) on it. The denser the pompoms will be to each other, the more splendid our New Year's Beauty will seem.
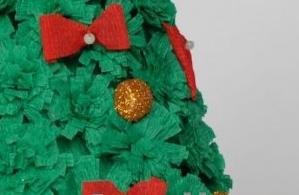
- For the decor we will make colorful bows. You can use a variety of colors, and we'll take red. We cut out a square 2 * 2 cm in size from corrugated paper. We put a bead on the string and tie our square in the middle. Edge raspushim. Our charming bow is ready. Make them in the quantity that you want to hang on our beautiful winter spruce (we did about 20).
- The next element of the decor will be from cotton wool. We take a small piece of cotton wool, we roll a ball out of it. Our ball can be moistened a little in glue, so that the glitter does not crumble. Then string the ball on the toothpick and roll in the sequins. Their number depends on how much you want to hang this ornaments on a Christmas tree (we did about 20).
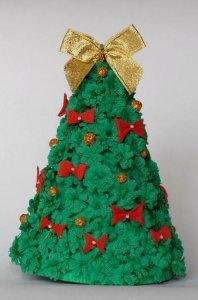
- We pass to the final and most pleasant moment - we will start decorating our sweet and ready-made Christmas tree. In a chaotic order we glue bows on it from all sides, do not forget about our balls of cotton wool.
- Using a ready bow, or taking a ribbon and threading in the middle of the bow, we decorate the top of the tree.
Our fur-tree with you is completely ready. The balls are poured on twigs, beautiful decor and unusual look. Gladify it with your family and friends, decorating your home or presenting yourself as a gift in honor of the upcoming holiday! We are sure that you and they will like this wonderful craft!