Postcard-origami
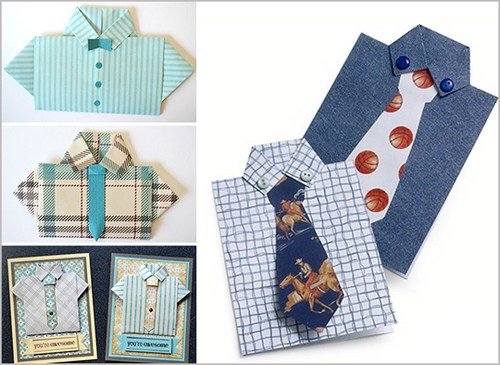
Undoubtedly, the word "origami" in many people is associated with something laborious and unbearable, but in reality this kind of art is simple enough. You only need to stock up a large piece of thin paper and patience. So, the step-by-step process of creating an unusual postcard on February 23 looks like this:
- Take a sheet of paper and fold it twice.
- Then each half again fold in half.
- The lower corners are wrapped inward and fold the workpiece.
- Then, unscrew the bottom of the sheet outward, acting neatly along the fold lines.
- Take the bottom edge of the sheet and fold it so that two beautiful triangles form on the sides of the workpiece. These will be sleeves for the shape of the future postcard.
- We put the sheet face down and fold the upper corners inside. It will be a collar for the shirt.
- Then bend in half and firmly press the lower part to the top. This is the shape of the shirt.
- We turn the sheet and put inside the written wish, money or any other pleasant trifle.
- We decorate with a homemade tie.
- The decoration is completed. You can use this card as an envelope, where you can put money, a ticket to the theater or to a concert, as well as any other note.
Decorate a postcard can be a neat butterfly, pockets, tie or buttons, so that it resembles the real attribute of a man.
Bulk artwork on February 23
This version of the holiday congratulation is somewhat more laborious, but as a result you will receive an original postcard, which will certainly please the originator of the celebration.
Materials for work:
- photo frame made of wood 10x15 cm;
- sponge;
- a set of colored pencils;
- white cardboard;
- acrylic paint;
- glue gun or superglue;
- colored paper.
Manufacturing process:
- Initially, decide on the theme of your craft. It can be an army idea for adult recipients or colored jewelry for little men. In this case, we have prepared a light photo frame and colored pencils.
- Paint the frame in the desired color, using a sponge and acrylic paints. Gently apply the dye composition to avoid the appearance of streaks of air bubbles.
- Using a glue gun, fix the pencils on the base.
- Fold the boat or plane manually and glue on the white cardboard.
- Insert the resulting picture into the photo frame.
- Done! An unusual greeting card for congratulating his son on February 23 is ready.