Yarn: Ram Angora, 40% mohair, 60% acrylic, 100 g / 500 m, color 512
Yarn Consumption: 80g
Knitting tools: a set of five spokes measuring 2.5 mm, hook 1.6 mm, two pins
Knitting density of the main knitting: 1 cm = 3.3 loops
Product size: palm girth = 17 cm
Palm length = 10 cm
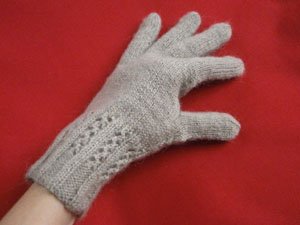
Warm gloves knitted with knitting needles - step by step instructions
- Collect 20 loops for the sample and tie a few cm with a stocking pattern, measure the width.
- Density of knitting: 20 loops / 6 cm = 3.3 loops in one cm.
- Hinges for knitting the palm of the hand: 3.3 hinges * 17 cm = 56.1. This number must be a multiple of 4 in this case equal to 56 loops.
- One spoke requires 56 loops / 4 spokes = 14 loops.
How to calculate the buttonhole.
- One finger is necessary: 56 loops / 4 spokes = 14 loops. Since the fingers are different, you need to add 1 loop to the middle and index finger, and take 1 loop from the little finger and the unnamed finger. For a girth between fingers to type on two additional loops.
- (14 + 1) + 2 = 17 loops on the index finger.
- (14 + 1) + 4 = 19 loops on the middle finger.
- (14 - 1) +4 = 17 loops on the ring finger.
- (14 - 1) + 2 = 15 loops on the little finger.
- The middle finger loops + 3 = 22 loops for the thumb.
Edge of product
- Bind one row of gum, closing the loop in a circle.
- Continuing circular knitting to tie an elastic band 3 cm long.
The report of the gum pattern consists of 6 loops: 2 eye loops, 4 purl loops.
Pattern
The report of the pattern consists of 6 loops.
- 1st row: 2 persons., 1 dep., 2 faces., 1 str.
- 2nd row: 2 persons., 1 out., Cape, 2 loops turn over and tie together the facial crossed, 1 out.
- 3rd row: 2 persons., 1 dep., 2 persons., 1 str.
- 4th row: 2 persons., 1 dep., 2 persons. to bind together, the Cape, 1 out of., 2 persons., 1 Thus, knit another 4.5 cm.
The technique of knitting 2 inverted loops along the face crossed is shown in the video below.
Glove base
- Mark the two extreme loops of the fourth knitting needle with another thread.
- On both sides of these loops, using the capers, add one loop each 2 rows. In the next row, the naca knit with a crossed crosshair. This is necessary for knitting a thumb.
- To connect, therefore, 10 loops, reseat them on pins.
- Next, above them, dial 10 more loops. Loosen the hinged loops by tying them together in two, through a row on both sides.
Knitting Finger Gloves
- Without tying 1 cm to the length of the palm, start knitting the little finger. On the little finger you need 16 loops. 7 loops take from the second spoke, 7 with the third and two loops of girth. The hinge will be divided into three spokes.
- Bind one half of the pinky's nail to start decreasing the loops: at the end of each knitting knit two loops together. Last three loops tighten.
- Knit the remaining fingers in the same way, just add 2 loops of girth on both sides of the fingers.
- To knit a thumb to re-make the loops from the pins on the spokes, the missing number of loops to add from the air and the extreme loops.
Next, knit like the previous toes.
Note: the knitting pattern of the second glove is the same as the first, only the addition for the thumb should be done on the third spoke, and the little finger is knit from the other side. Both gloves must be symmetrical.
Now the glove needs to be unscrewed and fixed all threads, slightly steam off with an iron or through a damp cloth.
Warm gloves are ready with knitting needles. The process of knitting is painstaking enough, but the result is worth it.