It is much more pleasant to receive and especially to give gifts in a beautiful original package. You can, of course, pack for the money in the store. But it's better to pack the gift yourself, by investing a part of your soul into the process. The crown of the gift wrapping will be a colorful paper bow. By the way, bows can decorate greeting cards, use them as fashion accessories, apply in serving tables, decorate interiors. Let's see how to tie a paper bow in various simple and intricate ways.
How to tie an ordinary paper bow
- We take a gift paper tape about 1 cm wide and cut a piece of 50 cm. From one edge of the paper tape we retreat centimeters 5-7 and fold the tape in half in the form of a semicircle (the "eyelet" was bent). The long tip can then be trimmed.
- With two fingers we hold the base of the "ear", and the long end of the paper tape is wrapped around the tab - we form the middle of the bow. In the middle we are dragging the second "eyelet" - we should get a bow, like shoelaces on shoes. Bows do not tighten!
- Now determine the size of the finished bow. Pull or tighten the ears to the desired size. It is necessary to act carefully. Although the gift paper is more durable, it still tears.
- In principle, the simplest paper bow is ready. In conclusion, the nodule can be glued or carefully tightened. To make the bow look organic, the loose ends are cut 1-2 cm longer than the eye loops. When decorating, the ears of the bow are placed on top. And from the bottom at right angles from each other free ends fall.
- If you use a special packing paper tape, then the ends can be left more authentic. After the formation of the bow, it is advisable to stretch the ends between the thumb and knife - the tape will curl up with a beautiful springy spiral.
- The usual bow looks simple. Much more elegant looks double (triple, etc.) bow. To get a double bow, then after the formation of the first bow knot to tighten (glue) is not necessary. On the contrary, it should be quite spacious. Then you can form on the second tab on each side, holding the paper tape through the middle of the knot. It is more convenient to use a separate piece of tape. And that the bow was colorful, we recommend using paper ribbons of two colors.
How to Tie a Bow Butter
- You will need two paper tapes: one wide - 3 cm, the second narrow (such an inflatable ball binds). We cut a wide tape a meter and a half. Fold it in half. From the inside of the bend, we glue along a narrow ribbon of the same length right along the middle of the wide ribbon. For it, we will then pull to collect a bow.
- Scissors undercut the bend in the form of a truncated pyramid. That is, the edges will be cut off, and in the center the ribbon will be joined. To ensure that the narrow ribbon is not peeled off, it can be fixed with a stapler at the base of the cut.
- Then, starting from the bend point, the summer should be divided into four segments: 9-9-13-14 cm. At the boundaries of these segments, we fix a wide tape on the sloping lines with the stapler: from bottom to top - from top to bottom - from bottom to top - from top to bottom. It turns out a kind of trapezoid. To make the bow turned symmetrical, the first bevel is made more gently in comparison with the three following. The most important condition: each of the four segments of a wide tape is fixed with two clips. In this case, a narrow ribbon should not pass freely between them (therefore the main tape must be wide).
- In the end, it remains to pull a thin ribbon and collect a bow with a butterfly. Tails of a bow can be twirled with scissors, to dissolve into narrow strips, to curtail it figuratively.
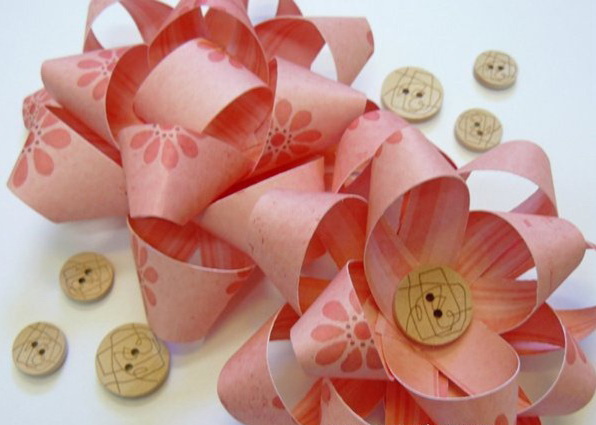
How to tie a bow-flower
- A very beautiful bow, and after a few workouts is done quickly enough. Consider the option, when there is no special paper tape. Take the paper you liked and cut out the strips: 4 pieces of 10x1.5 cm; 4 pieces of 12.5x1.5 cm; 4 pieces of 15x1.5 cm.
- Now, each strip is folded with an eyelet ("eyelet"), and the ends are glued together. Get 12 petals.
- Glued loops of the same size symmetrically fold in the form of a flower with four petals and glue them all together in the center. You will get three flowers of different sizes.
- At the end, we put the three parts of the flower into each other like a matryoshka - the smaller one into a larger one, and fasten it together. In this case, the petals of the upper (smaller) part should be located symmetrically between the petals of the lower part - the paper bow turns out to be more magnificent. The middle can be decorated with an additional ringlet, colored wires in the form of stamens, or any accessory. By the way, halves can not be glued, but sewed with a beautiful button.