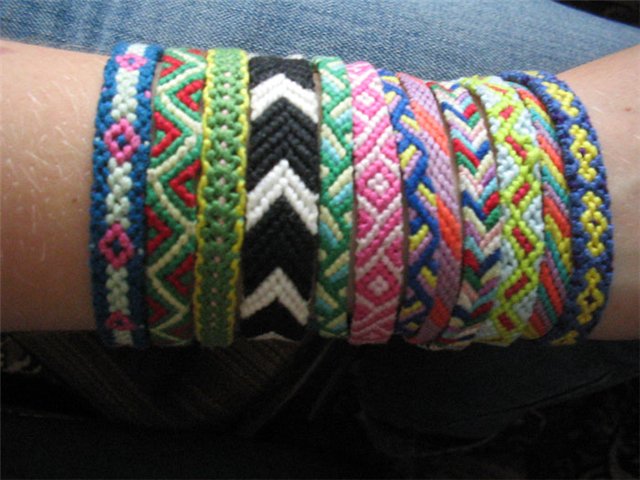
Beading is a very fascinating activity, from which you can enjoy not only the result obtained, but also the process itself. Fenitchka can be a beautiful and original gift to someone, and if you do not suffer from a lack of imagination, then the gift can be a real masterpiece. Beading is a very interesting activity, besides, weaving the beads from beads is quite simple.
The easiest broom for beginners
This fenechka is a slightly complicated model of the most diverse chains of the "ring" type, which are combined together.
It should be weaved in two strands, so it is necessary to wax the ends of the threads before the beginning of the weaving.
Three beads are threaded on a string or line and shifted to the middle. After this, each of the threads is passed through the bead hole, which turned out to be extreme on adjacent threads, so that the right thread must be passed through the bead on the right, and the left one, respectively, through the bead on the left. As a result, you should get a figure that looks like an inverted triangle.
After that, two beads are added to the thread on each side, then again the threads are passed through the beads in the same way - right through the last bead on the left, the left - through the extreme on the right.
Then three beads are added to each side, the thread is again passed through the outer beads, all in the same way - the left through the right bead, the right through the left, after which you need to make a draw.
To create the next element, two beads are added to both threads, the bunch is again made through the last beads of opposite sides. The last stage of weaving the first element is the passage of threads towards each other through a single bead.
Then the whole sequence of actions is repeated, forming this element of weaving the necessary number of times until the baubles are ready.
Trifle triangle
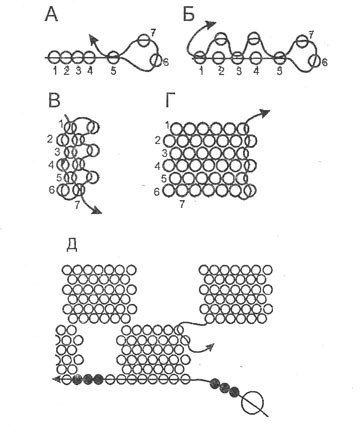
This method has another common name - weaving "in half a bolt". Fenichka paddles with one thread. First, ten beads are threaded onto it and the thread is passed through the first of them, after which six more beads are typed.
After that, the thread is stretched through the eighth from the beginning of the set to the bead and six new beads are once again threaded onto it. Then the thread is passed through the bead of the last link in such a way that a triangle is obtained. Next, the baubles fade in the same way, forming new triangles, which look alternately up and down.
The finished product is sewn into a ring. Alternatively, as an option, you can stretch the ribbon through the holes and apply it as a string.
Checkered chess piece
Weaving this fenechka is simple even for beginners. First, four beads are threaded, then three more, and finally, the last two. After that, the thread is passed through the fifth bead, then the third and the first. When finished, the thread turns and the baubles spreads according to the picture.
That is, when we weave a bracelet with this method, we get a kind of square made by "mosaic". After its completion, you start working on the second one, coming out of the initial, etc., until the product reaches the desired length.
After completion, it is still worthwhile walking around the edges with beaded threads, securing them with auxiliary beads. The product is ready.
Fenichka with little eyes
This weaving is also simple for beginners. Its difference is that in addition to beads and beads, eye-pearls are also used here.
The beginning of the baubles is the same as in the other, performed by the "wave."
Wave technique: 10 beads are threaded onto the string, followed by one bead, after which the line is pulled through the entire row of beads, forming a loop. After the thread is placed on 2 beads less, the bead is again threaded and the line is wound up for 2 beads before the first loop, runs through the entire row and forms a loop. The cycle is repeated the desired number of times.
After completing the first arc, add 10 more beads to the string and return to the beginning. Pass the thread through the bottom row of beads, adding a bead-eye to the center. Further, the work continues according to the figure below, after which a turn is made and the next eyelet begins to weave.