- white or milk Czech beads - 20 g
- burgundy beads - 8 g
- light yellow beads - 5 g
- light purple transparent beads - 8 g
- wire for beadwork
How to make orchid from beads - step by step instruction
- Let's start with the diagram. The figure shows that there is a central axis, behind which are attached beaded arcs. The number of beads for each petal can be calculated from the photo.
To the note: there are no exact schemes in the technique of the French weaving. It is better to determine the number of beads in the process of work, because for each specific case it is an individual indicator. The main thing - to understand the principle of weaving, and then you can easily determine how many beads thread on the wire.
- We need 2 pieces of wire. One - about 15 cm, the other - 40 cm. We twist them.
- For a short section we string 9 beads. On a long - 10. Again, twist.
- A short section is an axis. Long - "working thread." Principle of work: string the beads on the working wire, each time increasing their number by several pieces, and twisting around the axis.
- When there are 5 arcs on each side of the axis, the petal is ready. Bend the end of the center wire back and cut off. We need 5 such petals. One of them, the larger one, can be made with six arcs. In the side lobes add burgundy beads in any order.
- A feature of the orchid flower is the presence of the "lip". Shave the element in the same way as the petals. We use light purple beads. After the third arc, we make a reversal of the weave, not reaching the axis. So we will have a stepped edge.
On the photo, ready-made petals and "lip":
- Make an element for the core of the flower. The technique is "parallel weaving".
- Now on the turn a small petal of burgundy beads. Initially, on the axis, we collect 6 beads, tattoo along 3 arcs on each side.
Now all the elements for the core of the orchid are ready.
- Let's proceed to assembly. First we twist together two side lobes with burgundy patches and a large central petal. The further process of assemblage can be well considered on video.
- Straighten the petals so that our orchid of beads looked natural.
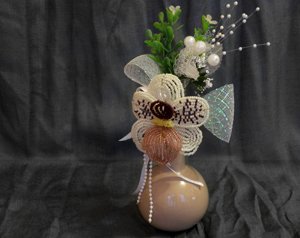
An unusually beautiful orchid of beads is ready!
You can make several such flowers, attach them to the stem and decorate the whole plant. Or you can just put an orchid in a small vase, adding the composition with green stems, beads and ribbons. Everything will depend on your imagination.