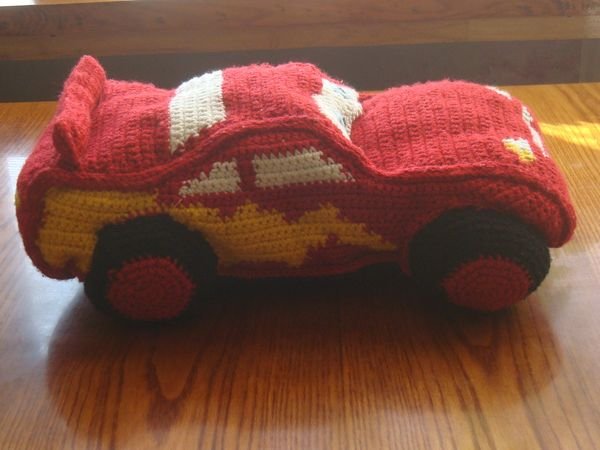
Lightning McQueen - the main character of the cartoon "Cars" is a popular cartoon character, which is loved by both children and adults. The toy industry produces many variants of the figures of this machine, but we suggest that you tie the toy McQueen with your own hands. Moreover, it is quite easy to do this. It is enough to have basic skills of needlework and a small supply of yarn. You can tie a toy with both knitting needles and a crochet.
Crochet toy McQueen - step by step instruction
It is not necessary to buy a new yarn for making a crocheting machine, it is also possible to use remains. The composition of the yarn is also not of fundamental importance, but to keep the shape better, use cotton and acrylic threads.
Necessary materials:
- Yarn of red color - 80 grams; yarn yellow (orange) color - 30 grams; yarn black (gray) color - 50 grams; yarn of white color - 15 grams
- Tools: hook №3, sewing needle, scissors
- Density of knitting horizontally: in 1 centimeter 2 loops
- Additional materials: sintepuh or holofayber for packing
- Size: length 34 cm.
On a note! All colors except red are variable. For example, if you have quite a bit of white thread, then only a windshield can be made of them. If there is no gray yarn, then the bottom of the machine can be tied with black thread, etc.
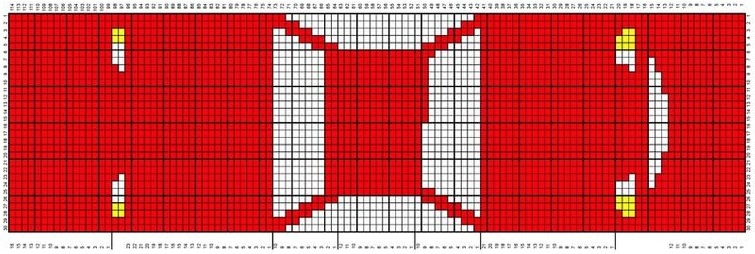
Scheme
The main part of a knitted crochet machine
- We begin to knit with red thread according to the scheme 1. Knit is necessary for both lobules of the column of the previous row.
- When the main part is ready, it must be tied around the perimeter with columns without a crochet or connecting posts (1 row of the web = 1 stalk of the strapping).
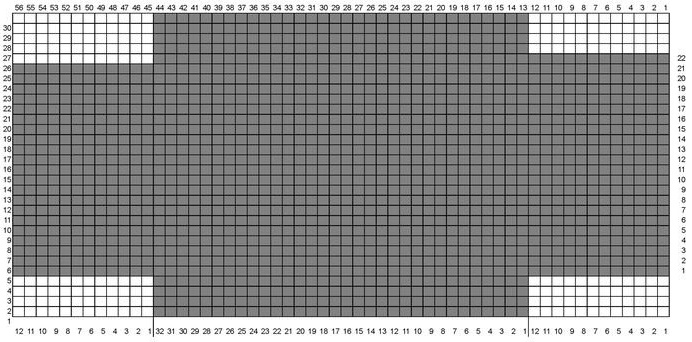
Details
- We now proceed to unfasten the two connecting side parts.
We will knit them according to scheme 2. We ground the bottom of the machine according to scheme 3. Next, we unfasten the wheels of the machine according to the rule of the circle. We send 2 air loops. In the second loop from the hook loop 6 posts without a crochet, we close the circle. (1 row - 6 columns). We make 2 loops of lifting, we sew 11 columns without a crochet on 6 columns of the previous circle (2 items from 1 loop, 2 rows - 12 posts).
In each successive series, we also add 6 loops in a uniform manner. It should turn out:
- 3 row - 18 columns
- 4th row - 24 columns
- 5 row - 30 bars, etc.
Attention! The number of rows depends on the diameter of the wheel of your machine, and the diameter, in turn, on the thickness of the yarn.
- When the desired diameter of the wheel is reached, we knit 3-4 rows without adding. Then we start the adjustments in the same way as the loops were added. Only now from the two loops of the previous row we unfasten one bar.
- In conclusion we knit a spoiler. For a spoiler, you need to associate a rectangle measuring 30 columns in 11 rows. Sew it and stuff it with holofiber or sintepuhom. Then carefully sew and hide the thread. Do not forget about the eyes. We knit them with a blue thread according to the rule of the circle. The diameter of the eye is checked with the windshield of the machine.
Build a toy
The assembly of the toy takes place in several stages. To begin with, it is necessary to sew or tie the elements of the machine together with a connecting post. Then you need to put the toy on the roof, tightly fill the cockpit with McKean, use a needle and thread to pull the front and rear windows together to give the machine the right shape. Then it is necessary to fill one half of the machine, sew the wheels and the spoiler. In the end, fill the second half of the machine and sew the wheels.
Attention! It is undesirable to insert cardboard patterns into the inside of the toy, since when washing, the cardboard becomes soaked and loses its shape. Inside the machine, it will dry badly and provide an unpleasant odor. If you need a frame, then you better use plastic.
Knitted needles toy McQueen - step by step instruction
Machine using knitting needles is more pillow-like and soft. Remnants of cotton or wool yarn can also be used for its production.
Necessary materials:
- Yarn of red color - 100 grams; yarn black (gray) color - 50 grams; yarn of white color - 15 grams; yarn of yellow (orange) color - 5 grams
- Tools: knitting needles 3,5; hook number 3.
- Additional materials: whether sintered linen for stuffing
- The density of knitting horizontally: in 1 centimeter 2 loops
- Size: length 34 cm
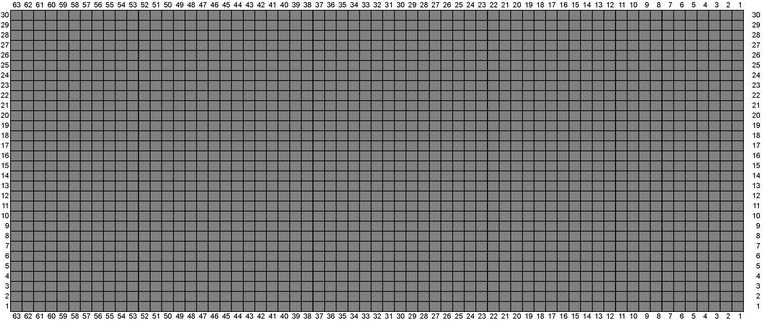
Scheme
The main part of knitted toys
- The main part of the toy will be knitted with knitting needles with the front face as per scheme 1.
On a note! To simplify the work on the main part, you do not have to remove headlights and mouth, and embroider them separately. But keep in mind that all the finishing work must be done before collecting the toy.
Additional Details
- Lateral connecting details and the bottom are knitted with the front surface according to schemes 2 and 3. If you have difficulties with the transition between colors, the side details can also be made in one color, then you can make embroidery or applique.
- The spoiler does not hold any shape at all. If it is densely packed, you get a thick sausage. If it is loose, it will sag. Therefore, you can:
- to sew a spoiler, like a bumper
- crochet it and sew it like a spoiler
- completely abandon the spoiler
- We remove the wheels according to the rule of the circle, described above in the version of the machine crocheted.
Assembling a knitted toy
- To assemble a toy, it's enough just to sew parts together, leaving a gap for stuffing. Fill Mcqueen with a holofiber or sintepuhom. Sew the wheels and spoiler.
Attention! Before proceeding with assembly, the parts connected by knitting need to be ironed through a damp cloth. Thus, the toy will better keep the shape.