On the eve of the New Year holidays, you can make so many decorations with your own hands. A Christmas tree made of ribbons is one of the easiest ways to decorate your house or office with help of improvised options. For example, you can make a ribbon herringbone on a magnet, in the form of a stand-decor or on the loop. Step-by-step instructions for all these crafts can be found in our article.
Christmas tree of tapes on a magnet - step by step instruction
Such an ornament can be hung on the refrigerator, metal furniture fittings or the front door. Herringbone of ribbons looks like a quality factory souvenir, and her golden beads are like cute miniature Christmas balls.
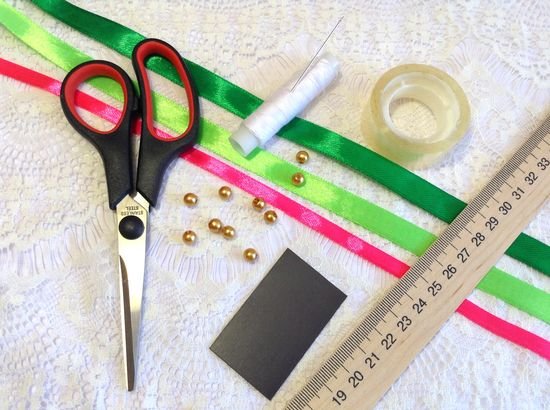
Necessary materials:
- tape width 1 cm dark green - 1 m.
- ribbon width 1 cm bright green color - 1 m.
- small gold beads - 10 pcs.
- a strip of soft magnet (you can use an old calendar on a magnet for a refrigerator) - 3 x 5 cm.
- thin bright pink or red tape - 15 cm.
- Needle with threads (preferably the color of beads)
- thin stationery scotch
- scissors
Main stages:
- Cut a rectangle of 3 cm by 5 cm from a soft magnet. Give it the shape of an elongated trapezoid, cutting the two upper corners with scissors.
- Turn the workpiece with the magnetic side down. From the dark green ribbon, fold 5 folds about 1.5-2 cm high. Glue the resulting "skirt" with adhesive tape to the bottom edge of the trapezoid and trim the rest of the tape.
- Just stick the same "skirt" with the next tier just above it.
- Continue to glue the band harmonics, alternating a dark and light tone and reducing the number of folds until you get a Christmas tree of ribbons on the magnet.
- Gently sew the gold beads in random order on the satin tree. Tie a pretty thin bow and sew it to the top of the product.
- A ready-made Christmas tree from satin ribbons with beads and a bow can be attached to a refrigerator at home or given to a friend.
Herringbone of ribbons for decorating the house - step by step instruction
Decorative Christmas tree of ribbons can be done literally in a matter of minutes. Experiment with the combination of colors of beads and ribbons, depending on the color scheme of the home interior or Christmas decorations. In addition, such a Christmas tree from the ribbon can serve as a symbolic gift to a loved one.
Necessary materials:
- bright green ribbon - 1 m.
- gold small beads - 2 pcs.
- large bright yellow beads - 10 pcs.
- green acrylic thread
- thin bright pink or red tape - 15 cm.
- needle
- scissors
Main stages:
- Cut the edges of the tape diagonally, giving them a more neat appearance.
- Cut a thread about 30 cm long. Pull one small bead to the thread to the middle. Then pass through the large yellow bead both ends of it.
- Thread the edge of the thread in the needle. Puncture the tape at one end and thread the next yellow bead.
- Form a loop about 5 cm in size and re-thread the thread through the tape. Add the following bead.
- Form the loops, alternating the ribbon with the beads. Moving upwards, make loops of ever smaller sizes. Fix the Christmas tree with another small bead at the top. To do this, draw a double thread from it, pull it back through the tape and the last yellow bead. Tie the thread around the main one, on which the "trunk" of the tree is collected and pull it back. Tie up the ends, creating a loop. Cut off excess strands and tape.
- Now the herringbone from the tape can be attached to the kitchen hook, to the bathroom, the hallway or to the handles of the furniture fittings or the window frame. Also, this decor is great for decorating a Christmas tree.
Two-color Christmas tree made of ribbons by hands - step by step instruction
This stylish and bright decoration can be used as an additional color accent to decorate the room before Christmas. It is the combination of red, gold and green shades in the West that is considered a symbol of this family holiday. A voluminous Christmas tree made of ribbons can be put on a table, a cot by the bed or under a decorated live Christmas tree. The basis can serve as a cone of cardboard, an unnecessary tube or even a thin bottle of deodorant.
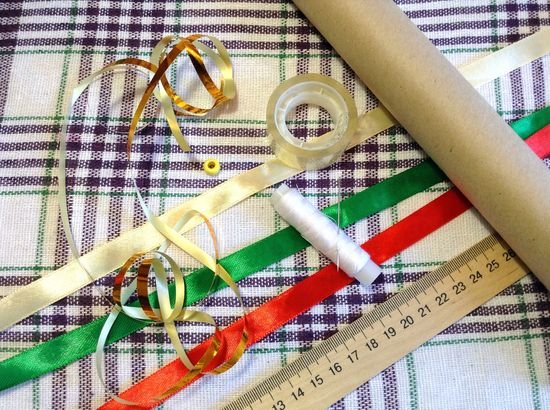
Necessary materials:
- tape width of 1 cm dark green color - 2 m.
- tape 1 cm wide red - 2 m.
- ribbon width 1 cm light beige or golden color - 0.5 m.
- piece of fir-tree rain or serpentine for internal filling
- knife and scissors
- ruler
- large bead for a bow - 1 pc.
- A cardboard tube (tube) from under the wrapping of a food film or a kitchen foil
- needle and thread (preferably light beige)
- serpentine (shiny ribbon) - 1 m.
Main stages:
- Cut the cardboard tube with a pair of scissors or a knife. It should be a workpiece about 15 cm high.
- Cut the red and green ribbon into pieces 8 cm long.
- Measure the circumference of the tube and cut a piece of scotch of the appropriate length. Pieces of tape fold in half and alternately paste on a strip of tape, leaving an indentation in half the width of the adhesive tape.
- Make 4 blanks of tape on Scotch tape and glue them on the tube alternately with tiers. Alternate two colors.
- Tie a neat bow of light beige tape and sew a bead on the center.
- The remains of a beige tape over the top of the tree. Sew a bow and fill the tube with a serpentine or a shiny ribbon. The finished tree of ribbons will be perfectly combined with other Christmas decorations and accessories.