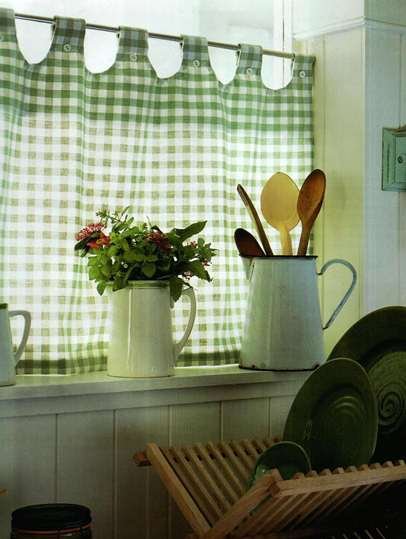
Curtains "Sweet Cafe"
Light curtains "Sweet Cafe" is ideal for a small kitchen. They will help create a cozy atmosphere and give a special charm to even the most modest room. Even a novice mistress will be able to make such curtains with her own hands.
Necessary materials:
- the cloth
- sewing thread in the tone of the main fabric
- chalk tailor's or dried soap
- fusing paper
- buttons
Preparation method:
- Measure the required amount of fabric, based on the width and height of the window. To the resulting segment, add 5 centimeters from the bottom edge and a small allowance for the upper seam (1-2 cm). For the future lining of the upper part of the curtains, a strip of fabric 23 cm thick and equal in length to the common cloth is required.
- The panel and lining for the upper part must be cut out, trowel each part to the width, if necessary. Make a template from the paper for the notched edge. Press from the edge of 6 mm to 3 mm in each addition to the wrong side of the upper piece. Secure the fabric with sewing pins and stitch.
- Attach the upper part to the panel with the faces and align the edges that are not sewn. Attach a paper pattern to the fabric, making an indent 1 cm from the edges and the top. Lock the pattern with English pins. Chalk or a piece of dried old soap around a pattern. Unfasten the pattern and put it aside.
- Lock the fabric with pins and sweep the parts, sewing around the marked lines along the side pieces to the bottom of the fabric.
- Stitch along the marked lines and remove the notch. Cut the serrated edge, leaving about 1 cm for the allowance along the entire seam.
- Make incisions on the fabric, keeping the distance to the seam is not less than 3 mm. Cut the corners of the allowances on the seams from the top of each tooth.
- Unscrew the top piece, carefully align the corners and press the treated edges. It is easy and quick to straighten the corners by using a point of a pair of scissors or knitting needles.
- Press the 6 mm edges on the underside of the backing by 3 mm for each addition, secure with pins and stitch it. Make with all edges around the perimeter of the panel.
- Press on the underside of 2 cm of the bottom edge of the future curtain 1 cm for each addition. Manually sew the "goat" seam.
- Unscrew the underside 4 cm from the top of each tooth and sew a "goat" with a seam.
- Sew the buttons on the front side of the curtain on each loop 5 cm from the top. For a more decorative effect, you can sew large buttons that will look great from afar.
Useful advice: to make the curtain beautiful and indoors, and outside, attach a lining to it, without sewing to the bottom of the panel. Then the curtain will look equally good and your hand craft will be noticeable even from the street.